Built for Google Sheets
Your next model—without the cold start
Open a workbook with clear tabs, labeled drivers, and layouts you can reshape in minutes—forecasting, P&L, cohorts, and more. Spend energy on the decision, not rebuilding the grid.
Find your template
Auto-Transfer Data Between Excel Worksheets
Do you regularly work with multiple Excel sheets and find yourself spending valuable time manually transferring data between them? If so, you're in luck! In this guide, you'll learn how to transfer data from one Excel worksheet to another automatically. By following the simple methods outlined below, you'll save time and increase efficiency in your data management tasks.
Before we dive into the methods of automating data transfer in Excel, let's understand the significance of this process and the benefits it offers.
Managing data across multiple worksheets can be time-consuming and prone to errors. However, by automating the data transfer process, you can:
-
Save time and effort by eliminating manual data entry.
-
Ensure data consistency and accuracy across worksheets.
-
Streamline your workflow and improve productivity.
-
Create dynamic connections between worksheets, allowing for real-time updates.
In this guide, we will explore various approaches to automatically transfer data between Excel worksheets, including using Excel formulas, Power Query, and VBA macros. Let's get started!
The Data Transfer Process Between Excel Worksheets
Data transfer between Excel worksheets involves the process of moving or copying data from one worksheet to another within the same Excel file. This transfer can be done manually by copying and pasting data, but it becomes tedious and time-consuming when dealing with large datasets or frequent data updates.
Automating the data transfer process in Excel offers a more efficient and streamlined approach. It allows you to establish connections between worksheets, ensuring that any changes made in the source worksheet are automatically reflected in the destination worksheet. This automation eliminates the need for manual data entry and reduces the risk of errors, ultimately saving time and improving data accuracy.
Importance of Automating the Excel Data Transfer Process
Automating the data transfer process in Excel provides several significant advantages:
-
Time-saving: Manually transferring data between worksheets can be a time-consuming task, especially when dealing with large datasets. By automating the process, you can significantly reduce the time and effort required for data transfer, allowing you to focus on more critical tasks.
-
Accuracy and Consistency: Manual data entry is prone to human errors, such as typos or copying mistakes. Automating the data transfer process helps maintain data accuracy and consistency since the transfer is based on predefined rules or formulas. This reduces the risk of data discrepancies and ensures that the transferred data is always up to date.
-
Efficiency and Productivity: Automating data transfer eliminates repetitive manual tasks, enabling you to work more efficiently and increase overall productivity. It frees up your time to concentrate on data analysis, decision-making, and other value-added activities.
-
Scalability: As the volume and complexity of data increase, manual data transfer becomes increasingly challenging. Automation allows you to handle larger datasets and more complex data transformations with ease, providing scalability for your data management needs.
Benefits of Using Excel Formulas and Functions
Excel formulas and functions are powerful tools that facilitate data transfer and manipulation within worksheets. Leveraging these features offers numerous benefits:
-
Data Transformation: Excel formulas and functions enable you to transform and manipulate data during the transfer process. You can perform calculations, apply conditional logic, and format data according to specific criteria. This flexibility allows you to tailor the transferred data to your desired format and meet specific requirements.
-
Real-Time Updates: When using formulas or functions to transfer data, any changes made to the source data are automatically reflected in the destination worksheet. This ensures real-time updates and data synchronization, eliminating the need to manually update transferred data.
-
Data Validation and Error Handling: Excel formulas and functions provide built-in error handling and data validation capabilities. You can use them to validate the transferred data, identify errors or inconsistencies, and handle exceptional cases, ensuring data integrity and accuracy.
-
Efficient Data Matching: Excel's lookup functions, such as VLOOKUP, INDEX/MATCH, or XLOOKUP, allow for efficient data matching during the transfer process. These functions help locate and retrieve relevant data based on specific criteria or unique identifiers, saving time and effort compared to manual searching.
Excel Data Transfer Methods
When automating data transfer between Excel worksheets, several approaches and tools are available, depending on the specific requirements and complexity of the task. Some commonly used approaches include:
-
VLOOKUP and INDEX/MATCH: These Excel functions are ideal for transferring data based on unique identifiers or matching criteria. They allow you to search for a value in one worksheet and retrieve a corresponding value from another worksheet, establishing a dynamic connection between the two.
-
Power Query: Power Query is a data transformation and connection tool in Excel. It provides a graphical interface to connect to various data sources, transform and clean the data, and load it into the destination worksheet. Power Query offers advanced capabilities for automating data transfer and is particularly useful for large datasets or when dealing with multiple data sources.
-
VBA Macros: Visual Basic for Applications (VBA) macros offer extensive automation capabilities in Excel. With VBA, you can write custom scripts to automate complex data transfer tasks, perform data manipulations, and create custom user interfaces. VBA macros provide unparalleled flexibility and customization options for automating data transfer processes.
-
Copy and Paste Link: This method involves copying data from one worksheet and pasting it as a linked value in another worksheet. It establishes a connection between the source and destination cells, allowing for automatic updates when the source data changes.
Each approach has its strengths and is suitable for different scenarios. Depending on your specific requirements, you can choose the approach that best fits your needs and optimizes your data transfer process in Excel.
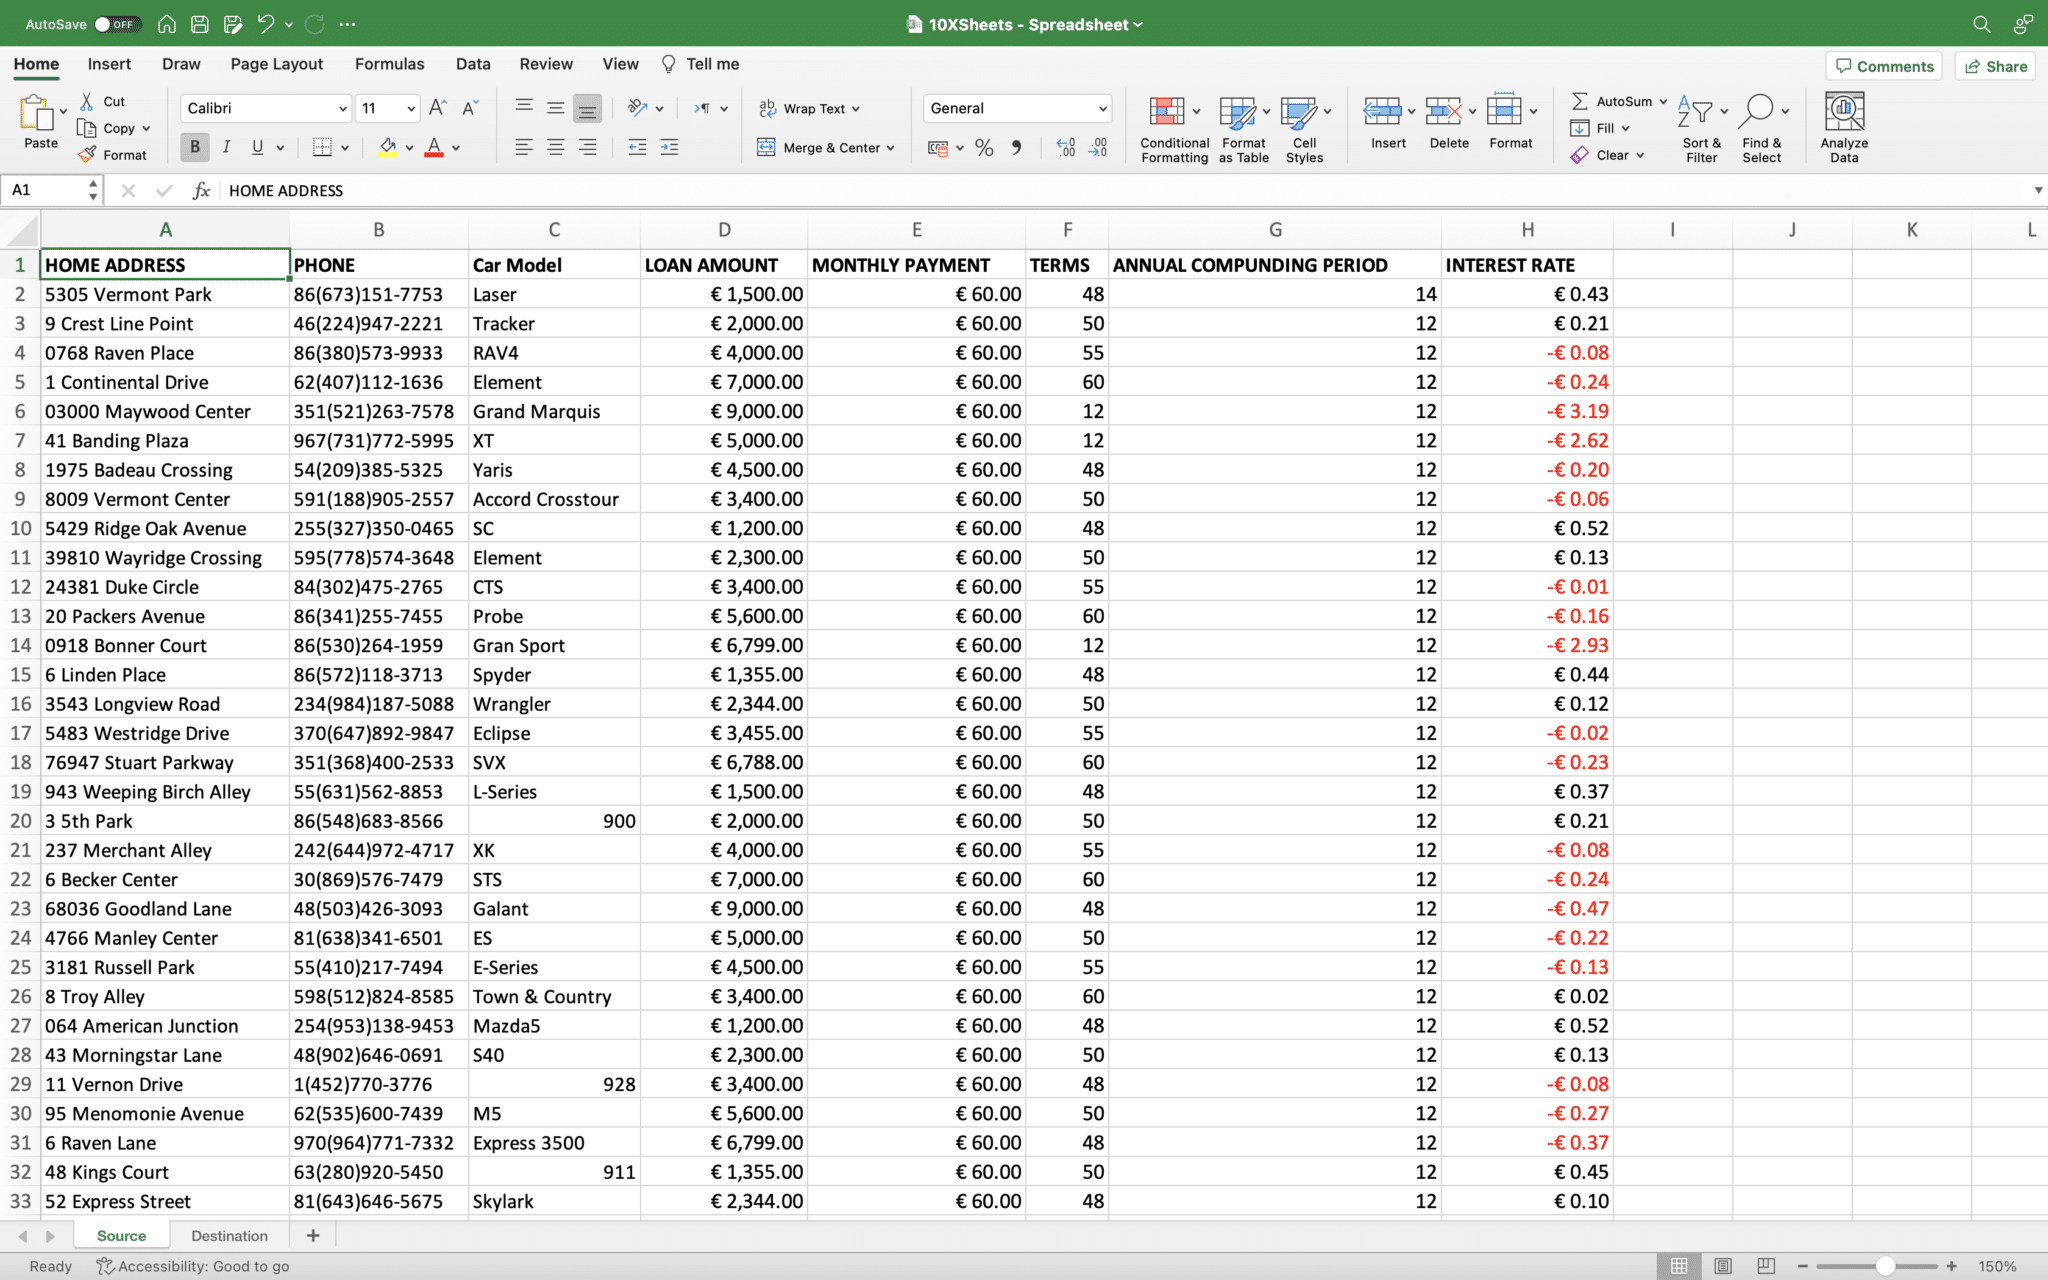
How to Prepare the Source Excel Worksheet?
Before transferring data, it's essential to prepare the source worksheet. Follow these steps to ensure your data is consistent and ready for automatic transfer:
-
Ensure data consistency and formatting: Check that the data in the source worksheet follows a consistent structure and format. This will make it easier to match and transfer data accurately.
-
Clean up unnecessary data: Remove any irrelevant or redundant data that is not required for the transfer process. This will help keep your worksheets clutter-free.
-
Identify unique identifiers for data matching: Determine which columns or fields in the source worksheet can serve as unique identifiers for matching data with the destination worksheet. These identifiers will enable accurate and reliable data transfer.
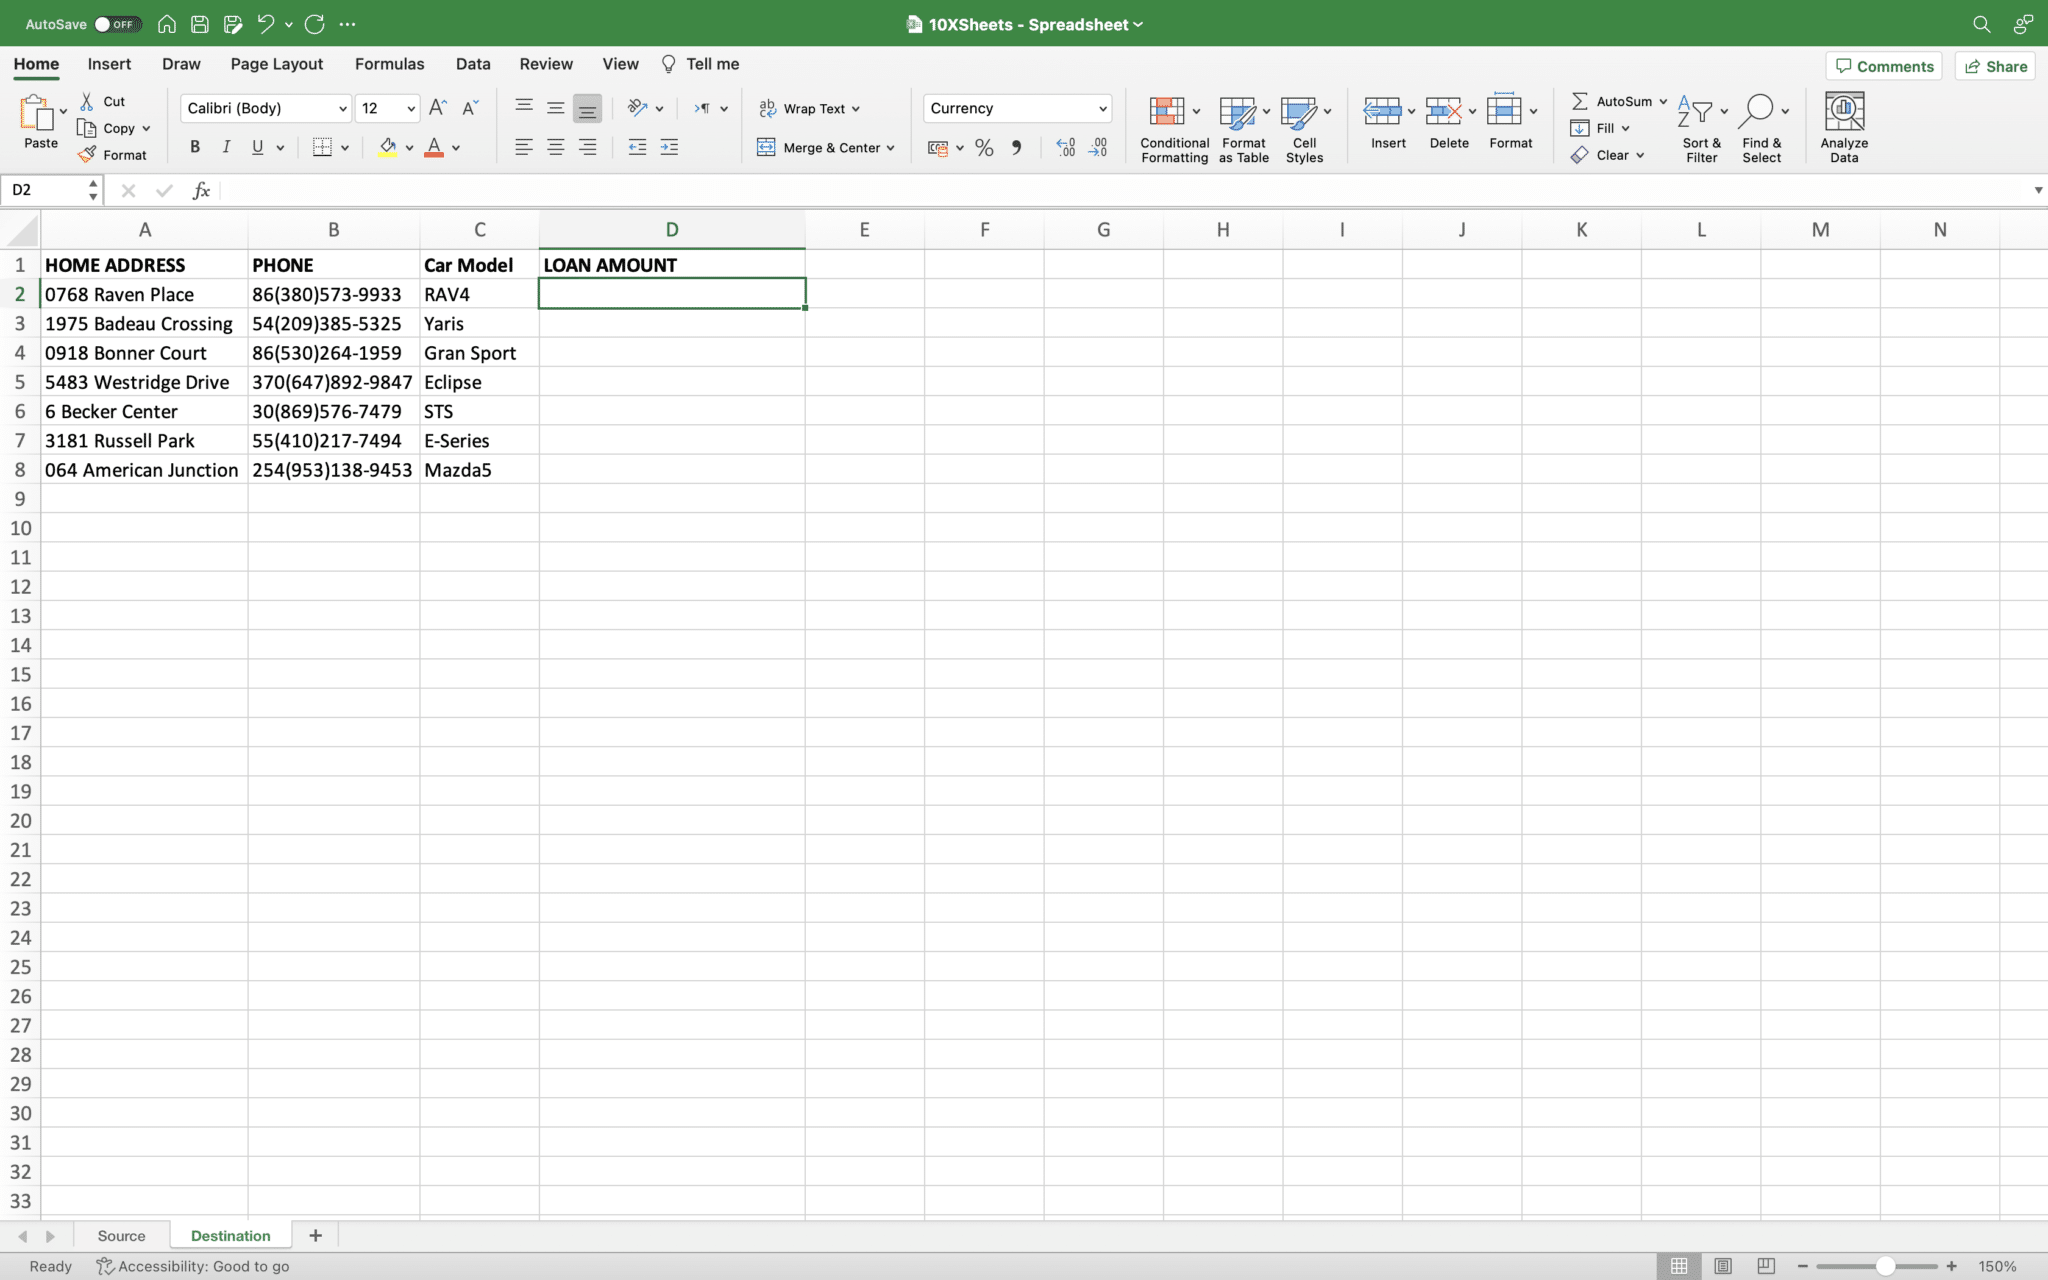
How to Set Up the Destination Excel Worksheet?
To transfer data automatically, you need to properly structure and allocate space in the destination worksheet. Follow these steps to set up the destination worksheet:
-
Create a new worksheet or identify an existing one: Decide whether you need to create a new worksheet in the same Excel file or use an existing one as the destination for the transferred data.
-
Structure the destination worksheet for data transfer: Set up the columns and rows in the destination worksheet to match the structure of the transferred data. Ensure that the columns are labeled appropriately for easy reference.
-
Allocate space for transferred data: Determine the range or area in the destination worksheet where the transferred data will be placed. This will ensure that the data is organized and easily accessible.
How to Use Excel Formulas to Transfer Data?
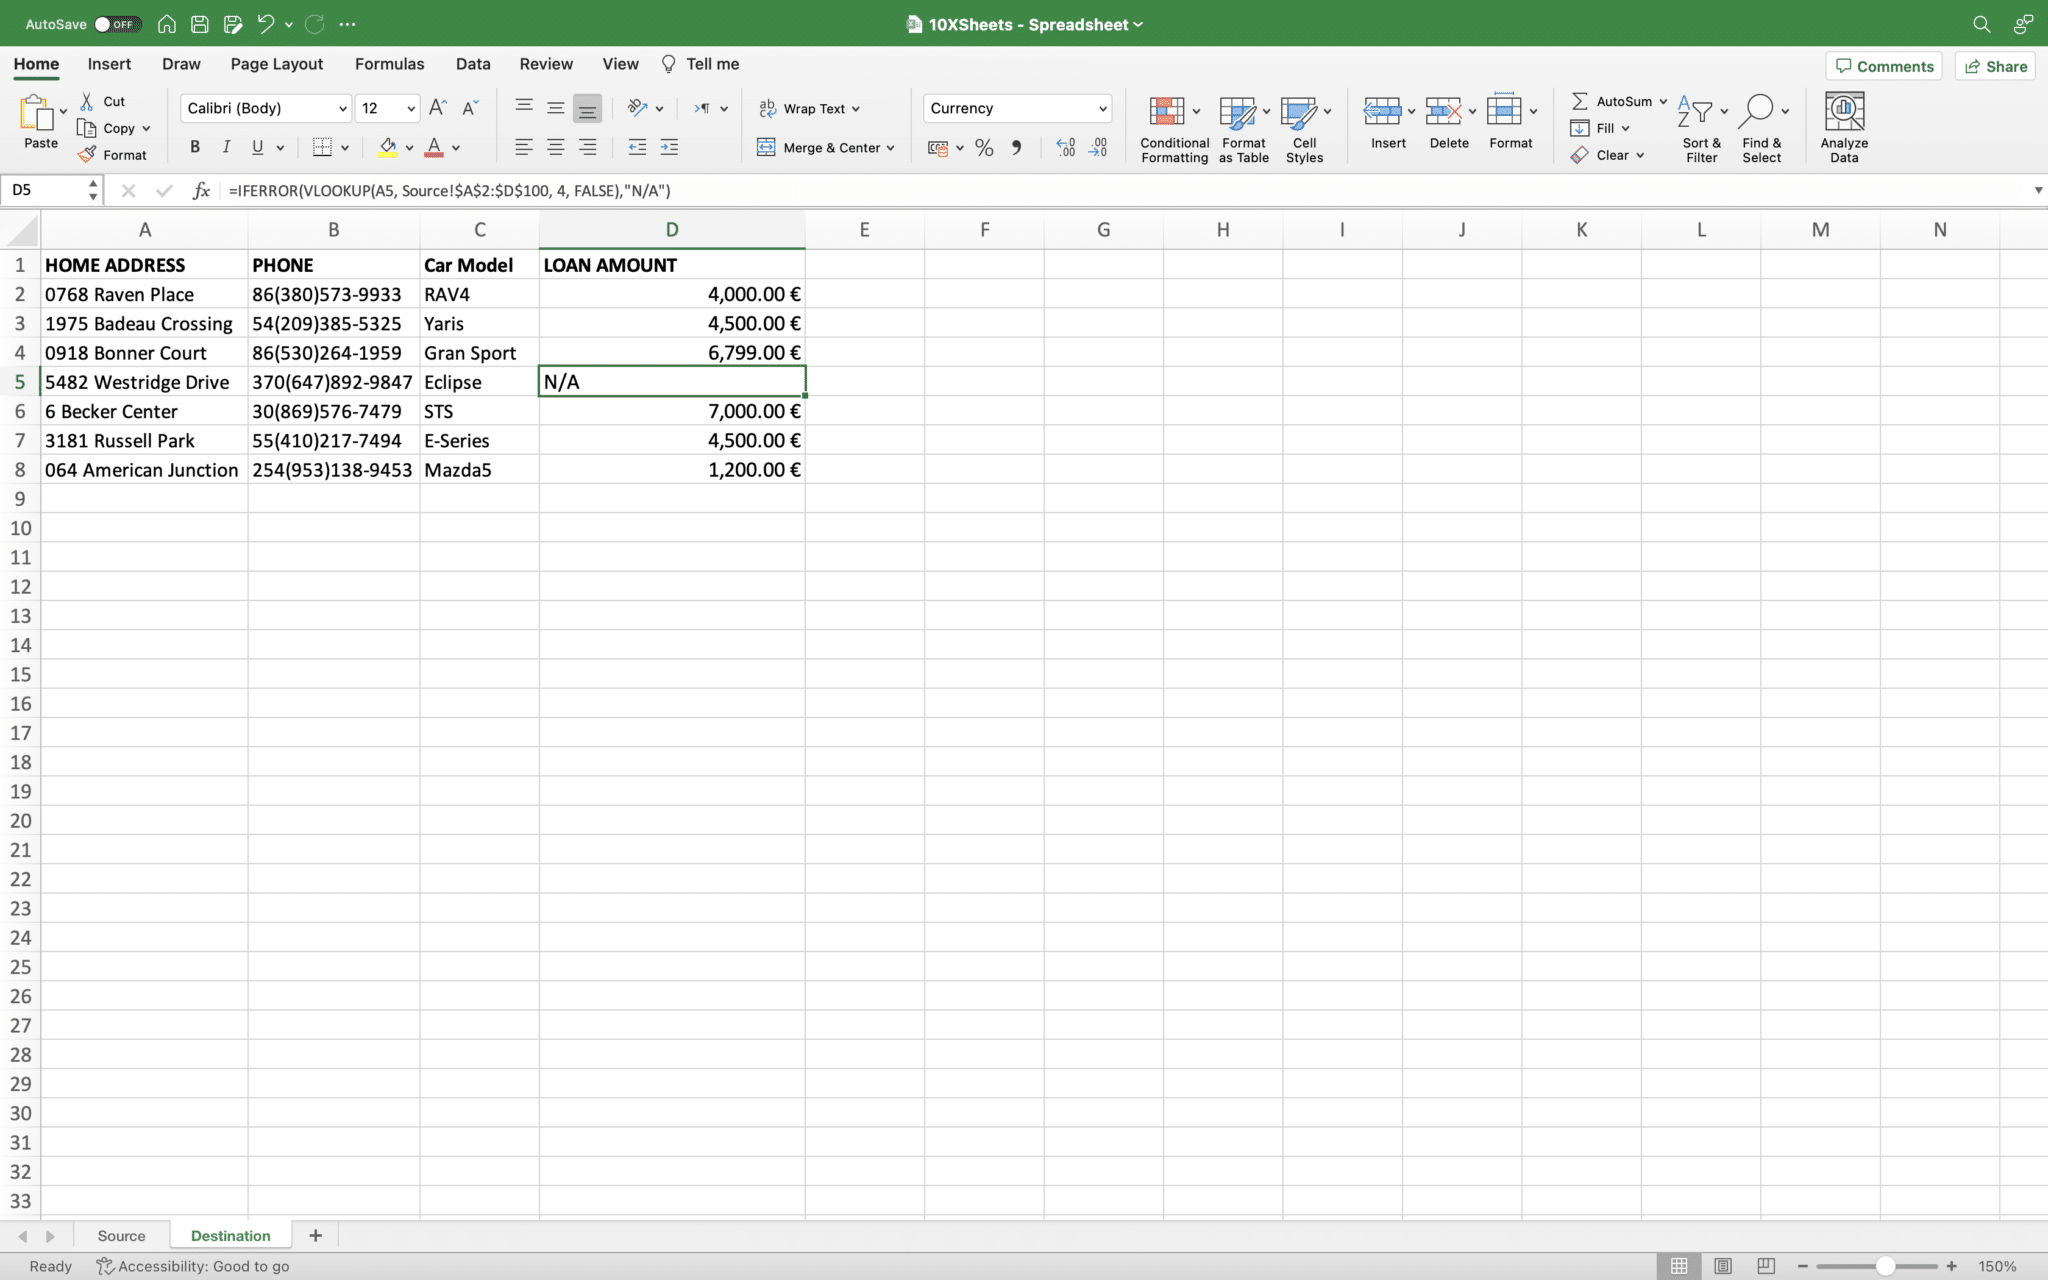
Excel provides powerful formulas and functions that can automate data transfer between worksheets. One commonly used formula for data transfer is the VLOOKUP function. Let's explore how to use it:
What is the VLOOKUP function?
The VLOOKUP function allows you to search for a value in one column of a dataset and retrieve a corresponding value from another column. This function is ideal for transferring data based on a unique identifier.
=VLOOKUP(What you want to look up, where you want to look for it, the column number in the range containing the value to return, return an Approximate or Exact match – indicated as 1/TRUE, or 0/FALSE).
How to Use VLOOKUP to transfer Excel data?
To transfer data using the VLOOKUP function, follow these steps:
- Specify the lookup value and range: Identify the unique identifier in the source worksheet and the range of data you want to search for the corresponding value.
Example: =VLOOKUP(A2, Source!$A$2:$D$100, 4, FALSE)
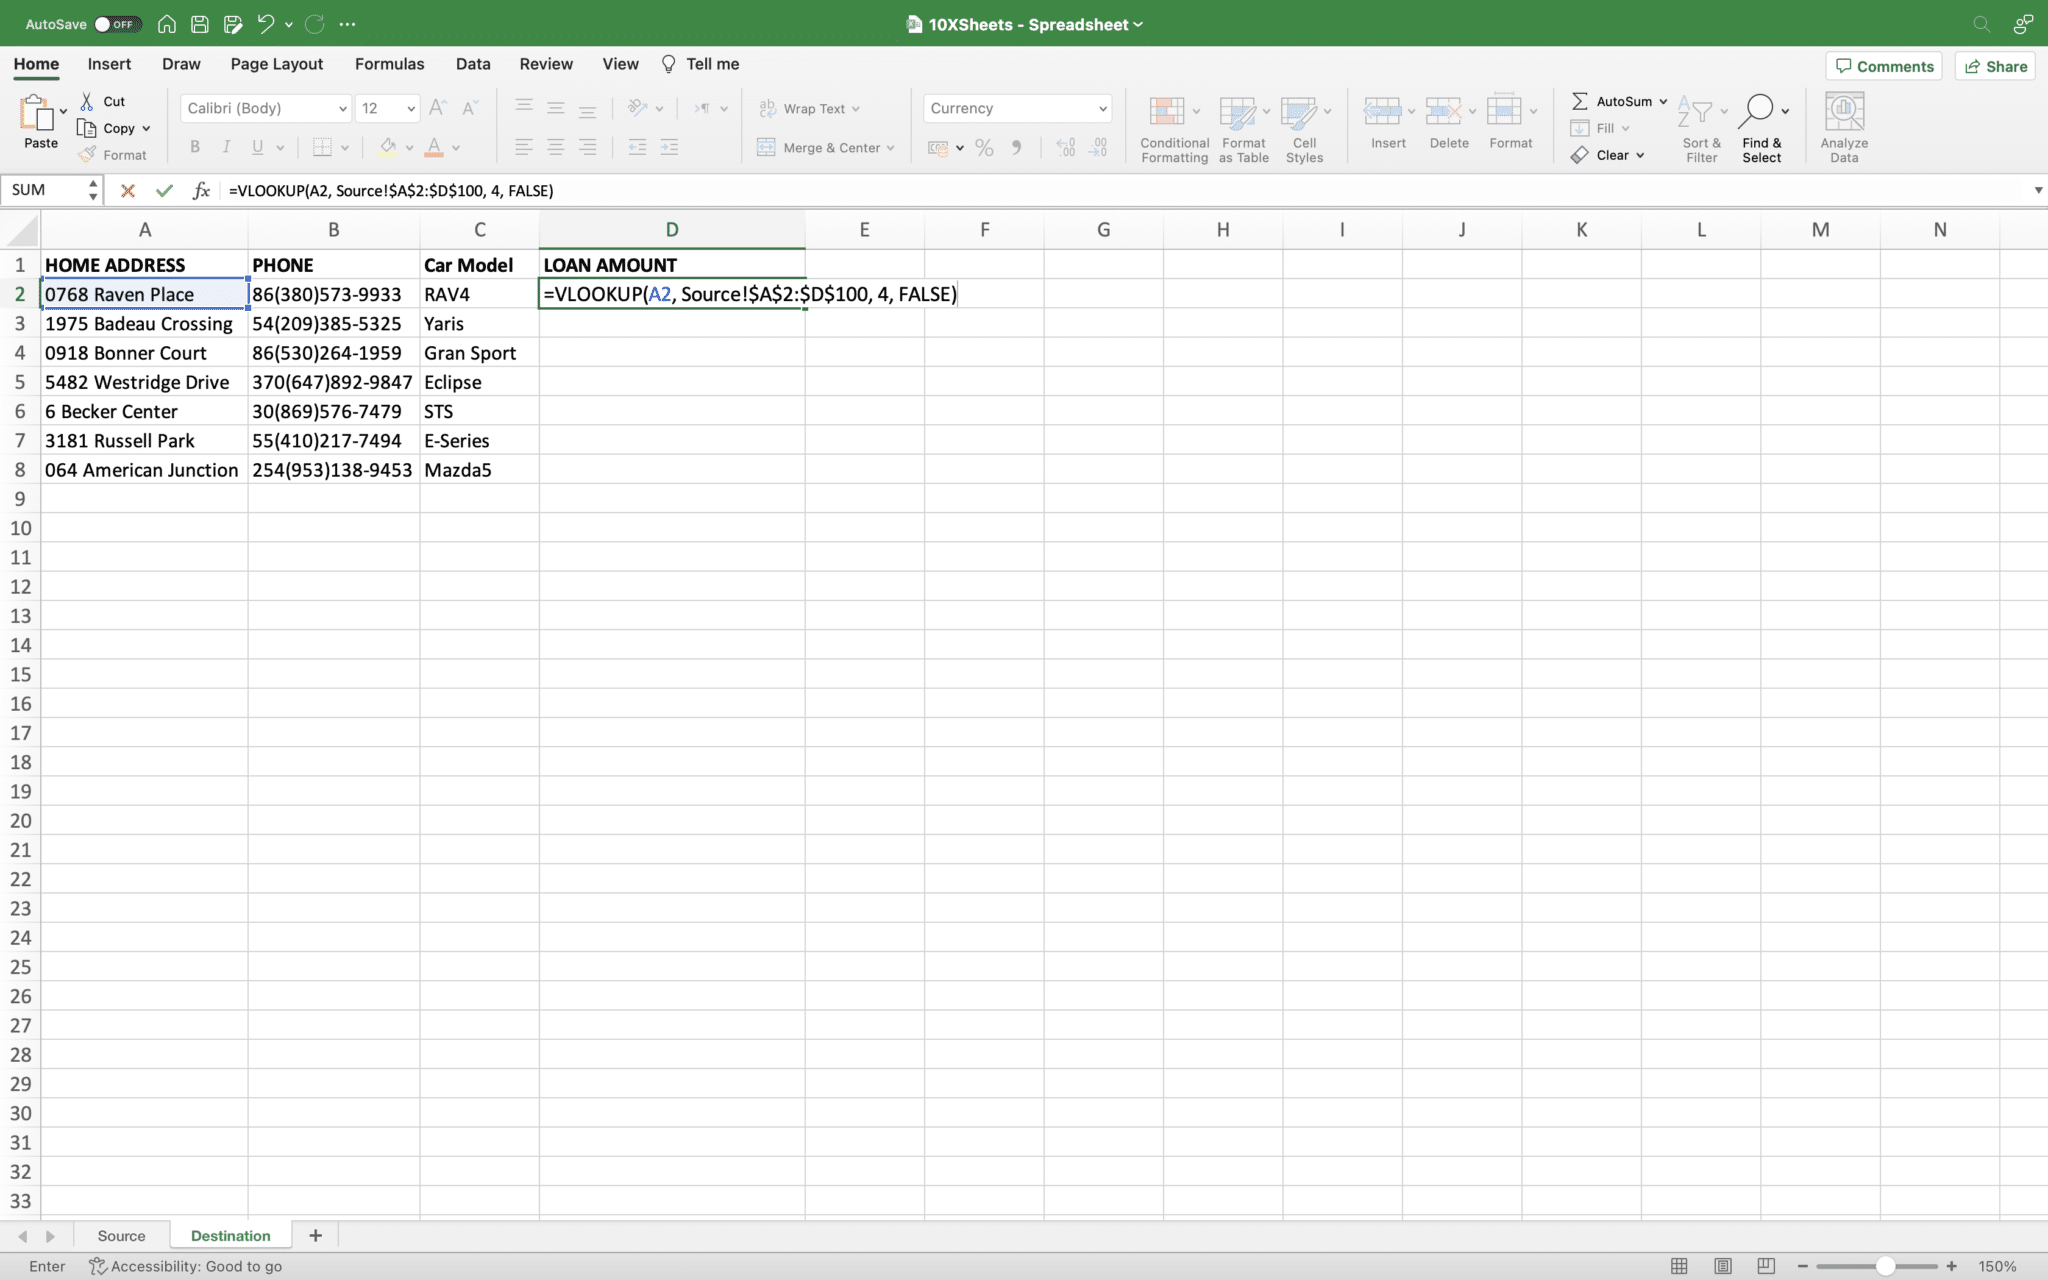
- Select the column to retrieve data from: Choose the column from which you want to retrieve the data based on the lookup value.
Example: In the formula above, the value from the fourth column is retrieved (4 represents the column index).
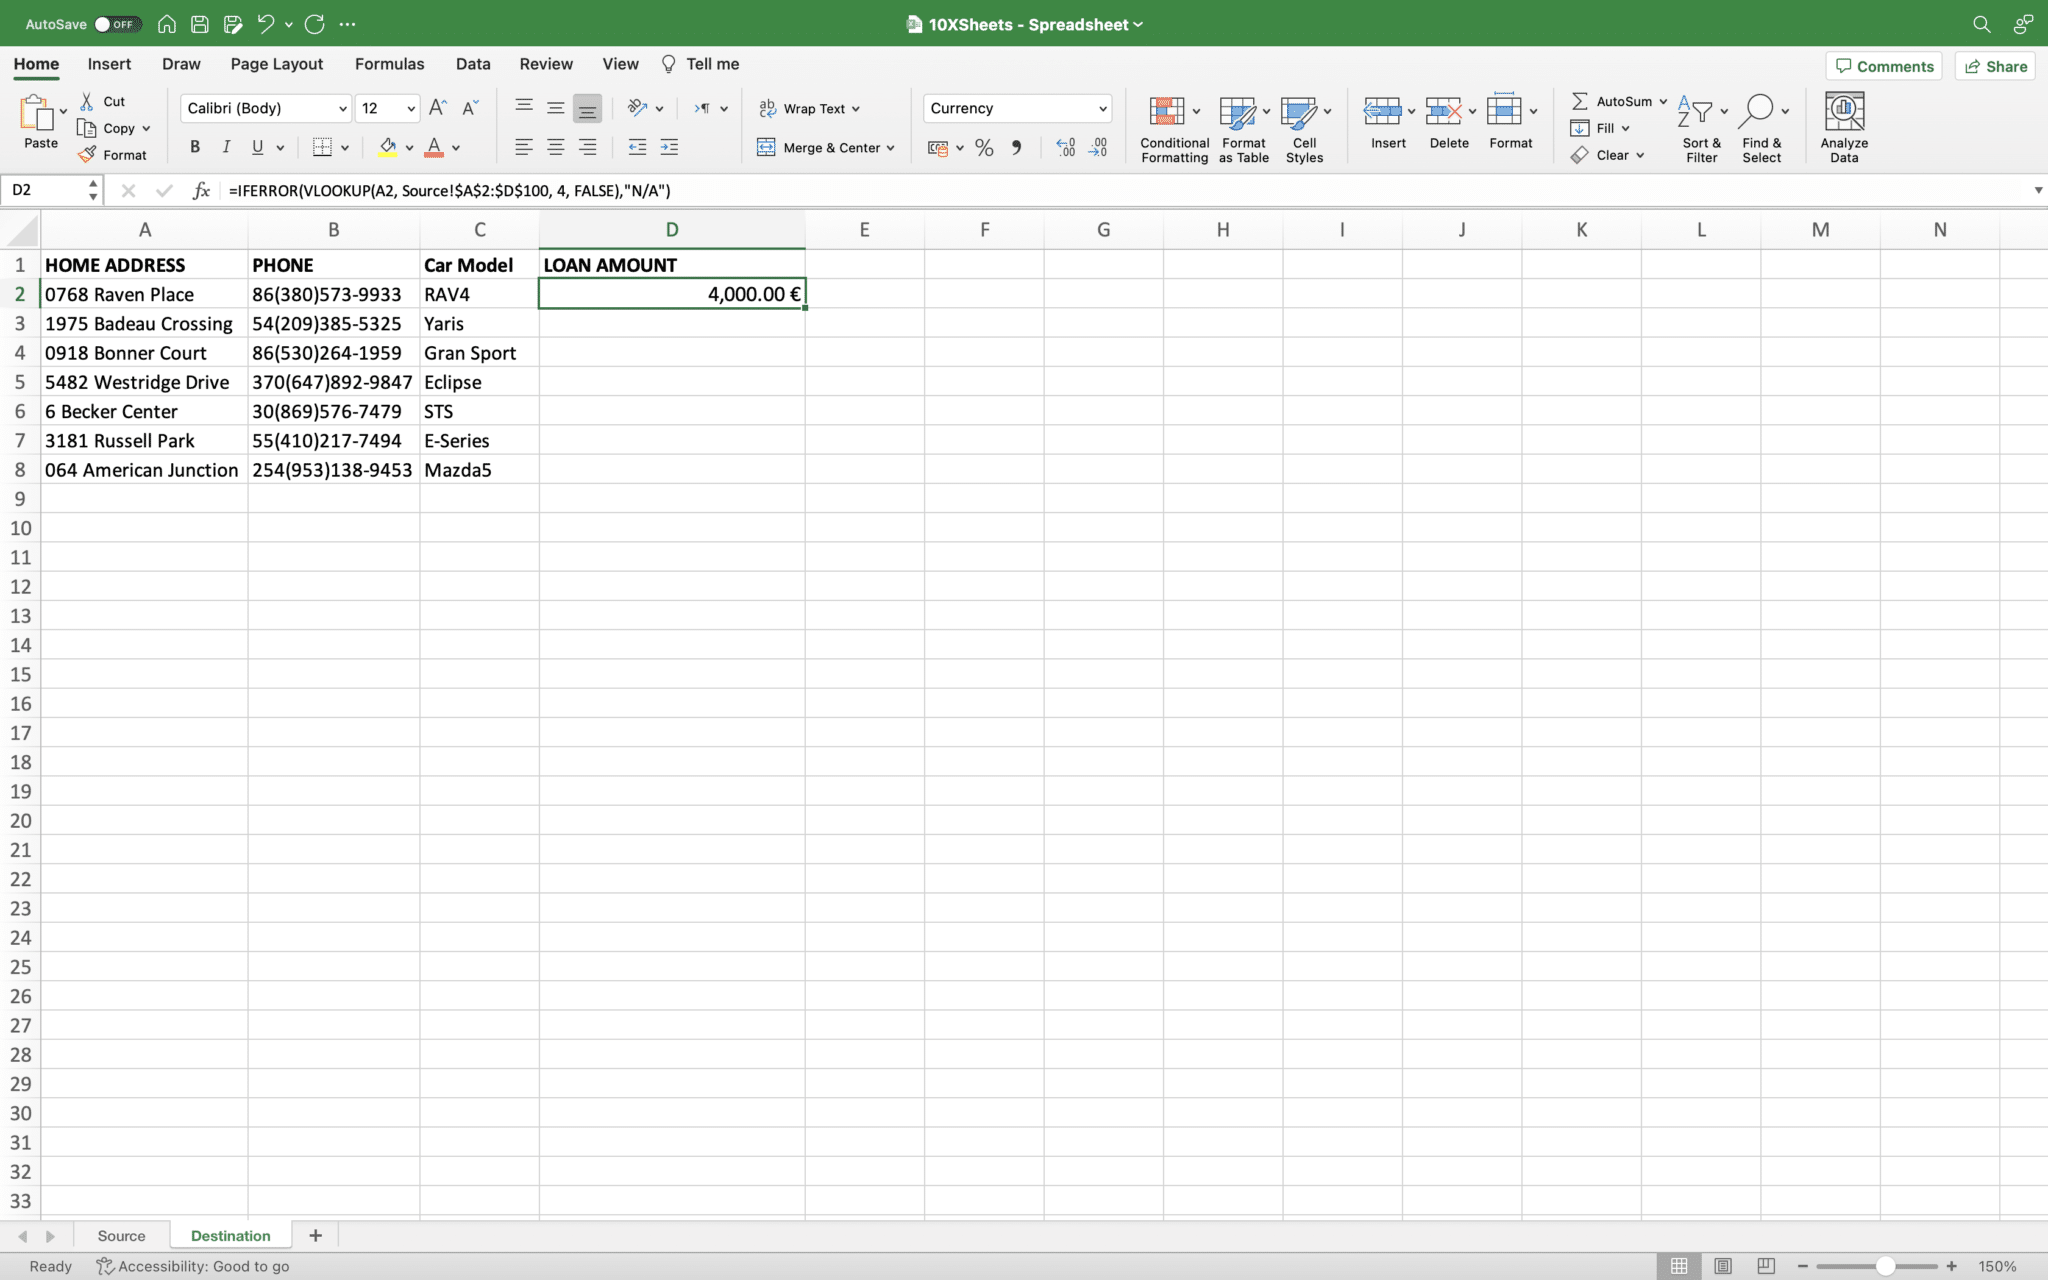
- Handle errors and N/A values: Consider using error-handling techniques, such as IFERROR, to handle cases where the lookup value is not found.
Example: =IFERROR(VLOOKUP(A2, Source!$A$2:$D$100, 4, FALSE), "N/A")
Alternative Excel data transfer methods: INDEX/MATCH function, XLOOKUP
Apart from VLOOKUP, there are other formulas you can use for data transfer:
-
INDEX/MATCH function: This combination of formulas allows you to search for a value in one column and retrieve a value from another column based on a matching criterion. It offers more flexibility and versatility than VLOOKUP.
-
XLOOKUP function: Introduced in newer versions of Excel, XLOOKUP simplifies the process of searching for and retrieving data based on multiple criteria. It is a powerful tool for automating data transfer in complex scenarios.
How to Automate Excel Data Transfer with Power Query?
Power Query is a data transformation and connection tool in Excel that can automate the process of transferring and consolidating data from multiple worksheets. Let's explore how to use Power Query for automated data transfer:
What is Power Query?
Power Query allows you to connect to various data sources, transform and clean the data, and load it into the destination worksheet. This ensures that the transferred data is up-to-date and ready for analysis.
Connecting to the source worksheet
To connect to the source worksheet using Power Query, follow these steps:
-
Open Power Query: In Excel, go to the Data tab and select "Get Data" or "From Table/Range."
-
Select the source worksheet: Choose the worksheet that contains the data you want to transfer.
-
Transform and clean the data: Use Power Query's built-in tools to perform data transformations, such as filtering, sorting, and removing duplicates, to ensure the data is in the desired format.
-
Merging or appending multiple worksheets: If you have data spread across multiple worksheets, Power Query allows you to combine them into a single dataset by merging or appending the data.
Loading the transformed data to the destination worksheet
Once you have transformed the data in Power Query, you can load it into the destination worksheet by following these steps:
-
Select the desired load option: Choose whether you want to load the data to an existing worksheet or create a new worksheet.
-
Specify the destination range: Define the range in the destination worksheet where the data should be placed.
-
Refresh data and maintain the connection: Power Query provides an option to refresh the data from the source worksheet, ensuring that any changes made in the source are automatically reflected in the destination.
How to Transfer Excel Data Using the Copy and Paste Link Method?
Another straightforward method for automating data transfer between Excel worksheets is the Copy and Paste Link function. This method allows you to link the pasted value in the destination worksheet to the copied value in the source worksheet.
To transfer data using the Copy and Paste Link method, follow these steps:
-
Open two spreadsheets containing the same dataset: Ensure that both the source and destination worksheets are open in Excel.
-
Copy a value from the source worksheet: Select the desired cell in the source worksheet and use the Ctrl + C (Windows) or Cmd + C (Mac) shortcut to copy the value.
-
Paste the value with Link in the destination worksheet: Right-click on the corresponding cell in the destination worksheet, choose the "Paste" option, and select "Link." This will paste the value from the source worksheet and create a dynamic link between the two cells.
-
Verify the link and observe automatic updates: To ensure the link is established, modify the value in the source cell and observe the automatic update in the destination cell.
The Copy and Paste Link method provides a simple and efficient way to transfer data while maintaining a connection between the source and destination worksheets.
How to Transfer Excel Data Using the Worksheet Reference Method?
The Worksheet Reference method is another manual yet effective way to transfer data between Excel worksheets. This method involves referencing a cell in the source worksheet from the destination worksheet.
Follow these steps to transfer data using the Worksheet Reference method:
-
Open two spreadsheets containing the same dataset: Ensure that both the source and destination worksheets are open in Excel.
-
Create a reference formula in the destination worksheet: Double-click on the desired cell in the destination worksheet where you want to transfer the data. Then, type an equal sign (=) to start the formula.
-
Select a value from the source worksheet to transfer: Switch to the source worksheet, click on the cell containing the value you want to transfer, and press Enter.
-
Verify the link and observe automatic updates: Return to the destination worksheet and confirm that the formula cell now displays the transferred value. Any changes made to the value in the source cell will be automatically reflected in the destination cell.
By using the Worksheet Reference method, you can establish a connection between cells in different worksheets, enabling seamless data transfer and updates.
How to Move Excel Data Based on Criteria Using the Filter Feature?
In addition to transferring data between worksheets, you may also need to move specific data based on certain criteria. Excel's filter feature allows you to filter and extract data based on column criteria, making it easier to transfer only the desired information. Follow these steps:
Moving Excel data based on criteria
Excel's filter feature enables you to extract data from a dataset based on specific criteria defined for a particular column. By filtering the data, you can easily identify and transfer the relevant information to a new worksheet.
Filtering data in Excel based on column criteria
To filter data in Excel, follow these steps:
-
Open a dataset on an Excel worksheet with filterable criteria: Ensure that the dataset you want to filter is available in an Excel worksheet.
-
Select the criteria column to filter: Choose the column that contains the criteria by which you want to filter the data.
-
Enable the filter: Go to the Data tab in Excel's ribbon and click on the "Filter" button. This will add filter dropdowns to each column header.
-
Filter the data: Click the small arrow beside the column header that corresponds to the criteria column. This will open a drop-down menu.
-
Specify the criteria to keep: In the drop-down menu, select the checkbox(es) corresponding to the row(s) that meet your criteria. Click "Apply" to apply the filter.
-
View the filtered data: Excel will now display only the data that matches your specified criteria, allowing you to focus on the relevant information.
Selecting and copying filtered Excel data
Once you have filtered the data based on your criteria, you can easily select and copy the filtered data by following these steps:
-
Select the filtered data: Click and drag to select the filtered data in the worksheet.
-
Copy the filtered data: Use the Ctrl + C (Windows) or Cmd + C (Mac) shortcut to copy the selected data.
Pasting the filtered Excel data into a new sheet
To transfer the filtered data to a new sheet, create a new worksheet or select an existing one, and then paste the copied data using the Ctrl + V (Windows) or Cmd + V (Mac) shortcut.
Excel Data Transfer Troubleshooting and Error Handling
While automating data transfer in Excel, you may encounter common issues or errors. Here are some tips for troubleshooting and error handling:
-
Identifying common issues during data transfer: Pay attention to potential problems such as mismatched data formats, missing or incorrect formulas, or incorrect cell references.
-
Debugging Excel formulas, Power Query, and VBA macros: Double-check formulas, function arguments, and Power Query transformations to ensure accuracy and identify any errors.
-
Handling errors and managing data inconsistencies: Implement error-handling techniques, such as using IFERROR or IFNA functions, to handle errors and inconsistencies in the data transfer process.
By being proactive in troubleshooting and error handling, you can ensure a smooth and error-free data transfer experience in Excel.
Excel Data Transfer Best Practices
To optimize your data transfer processes in Excel, consider implementing the following best practices:
-
Keeping data organized and structured: Maintain a consistent structure across worksheets, use clear column labels, and follow a standardized format to enhance data organization.
-
Regularly updating and refreshing data: Periodically update the source data to ensure the transferred data remains accurate and up to date. Refresh Power Query connections to fetch the latest data from external sources.
-
Ensuring data integrity and accuracy: Validate the transferred data for accuracy and consistency, and perform regular checks to identify any discrepancies.
-
Documenting data transfer processes and formulas: Maintain documentation detailing the data transfer methods and formulas used. This will serve as a reference and aid in troubleshooting or updating the process in the future.
By adhering to these best practices, you can establish efficient and reliable data transfer processes in Excel.
Conclusion
Automating the process of transferring data between Excel worksheets is a valuable skill that can save you time and enhance your data management capabilities. By following the methods outlined in this guide, such as using Excel formulas, Power Query, and the Copy and Paste Link or Worksheet Reference methods, you can streamline your workflow and ensure data consistency across worksheets.
Additionally, the ability to move data based on specific criteria using Excel's filter feature provides further flexibility and efficiency in data transfer tasks.
Remember to troubleshoot any issues that may arise during the data transfer process and implement best practices to maintain data integrity and accuracy.
Excel offers a range of powerful features to automate data transfer, and by leveraging these capabilities, you can enhance your productivity and make data management in Excel a breeze.
Frequently asked questions
How to Prepare the Source Excel Worksheet?
Before transferring data, it's essential to prepare the source worksheet. Follow these steps to ensure your data is consistent and ready for automatic transfer: !Worksheet logo Ensure data consistency and formatting: Check that the data in the source worksheet follows a consistent structure and format. This will make it easier to match and transfer data accurately. Clean up unnecessary data: Remove any irrelevant or redundant data that is not required for the transfer process. This will help kee
How to Set Up the Destination Excel Worksheet?
To transfer data automatically, you need to properly structure and allocate space in the destination worksheet. Follow these steps to set up the destination worksheet: !Worksheet logo Create a new worksheet or identify an existing one: Decide whether you need to create a new worksheet in the same Excel file or use an existing one as the destination for the transferred data. Structure the destination worksheet for data transfer: Set up the columns and rows in the destination worksheet to match th
How to Use Excel Formulas to Transfer Data?
Excel provides powerful formulas and functions that can automate data transfer between worksheets. One commonly used formula for data transfer is the VLOOKUP function. Let's explore how to use it:
How to Automate Excel Data Transfer with Power Query?
Power Query is a data transformation and connection tool in Excel that can automate the process of transferring and consolidating data from multiple worksheets. Let's explore how to use Power Query for automated data transfer:
How to Transfer Excel Data Using the Copy and Paste Link Method?
Another straightforward method for automating data transfer between Excel worksheets is the Copy and Paste Link function. This method allows you to link the pasted value in the destination worksheet to the copied value in the source worksheet. To transfer data using the Copy and Paste Link method, follow these steps: Open two spreadsheets containing the same dataset: Ensure that both the source and destination worksheets are open in Excel. Copy a value from the source worksheet: Select the desir
How to Transfer Excel Data Using the Worksheet Reference Method?
The Worksheet Reference method is another manual yet effective way to transfer data between Excel worksheets. This method involves referencing a cell in the source worksheet from the destination worksheet. Follow these steps to transfer data using the Worksheet Reference method: Open two spreadsheets containing the same dataset: Ensure that both the source and destination worksheets are open in Excel. Create a reference formula in the destination worksheet: Double-click on the desired cell in th
How to Move Excel Data Based on Criteria Using the Filter Feature?
In addition to transferring data between worksheets, you may also need to move specific data based on certain criteria. Excel's filter feature allows you to filter and extract data based on column criteria, making it easier to transfer only the desired information. Follow these steps: