When working with large datasets in Excel, duplicate entries can create a multitude of problems. Duplicates can lead to inaccurate analysis, confusion, and wasted time. However, by effectively removing duplicates, you can ensure the integrity and reliability of your data. In this comprehensive guide, you will learn various techniques to identify and remove duplicates in Excel, both through built-in features and advanced methods. By the end of this guide, you will have the knowledge and tools to maintain clean and duplicate-free data.
Understanding Duplicate Data
Duplicate data refers to entries in a dataset that are identical or partially identical to other entries. It can occur due to data entry errors, system glitches, or data integration processes. Understanding the types and consequences of duplicate data is crucial for efficient removal. There are three main types of duplicates:
- Exact duplicates: Entries that are entirely identical in all columns.
- Partial duplicates: Entries that share some similarities but may differ in specific columns.
- Case-sensitive duplicates: Entries that appear the same but have different capitalization or formatting.
Why Removing Duplicates Matters
Removing duplicates is essential for ensuring accurate and reliable data. Here are some reasons why it matters:
- Data accuracy and consistency: Duplicate entries can lead to misleading calculations, erroneous conclusions, and unreliable reports. By removing duplicates, you can maintain the accuracy and consistency of your data.
- Data analysis and decision-making: Duplicates can skew analysis results and hinder effective decision-making. Eliminating duplicates allows for more accurate insights and informed decisions.
- Data integrity and reliability: Duplicate data can create confusion, misinterpretation, and distrust. By removing duplicates, you establish a foundation of reliable data that can be trusted and used with confidence.
Preparing Your Excel Data
Before diving into duplicate removal techniques, it’s important to properly prepare your Excel data. Follow these steps to ensure optimal results:
- Organizing and structuring data: Arrange your data in a consistent and logical manner. Use separate columns for different types of information and ensure that each column represents a specific data field.
- Cleaning and formatting data: Remove any unnecessary spaces, special characters, or formatting inconsistencies. Ensure that data is correctly formatted in each column, such as dates, numbers, or text.
- Identifying key columns: Determine which columns contain the most relevant data for duplicate identification. Key columns typically include unique identifiers such as product codes, customer IDs, or email addresses.
Built-in Excel Features for Removing Duplicates
Excel provides built-in features that make removing duplicates a breeze. Here’s how to use them effectively:
Using Excel’s Remove Duplicates feature
Excel’s Remove Duplicates feature allows you to quickly eliminate duplicate entries from your data. Follow these steps:
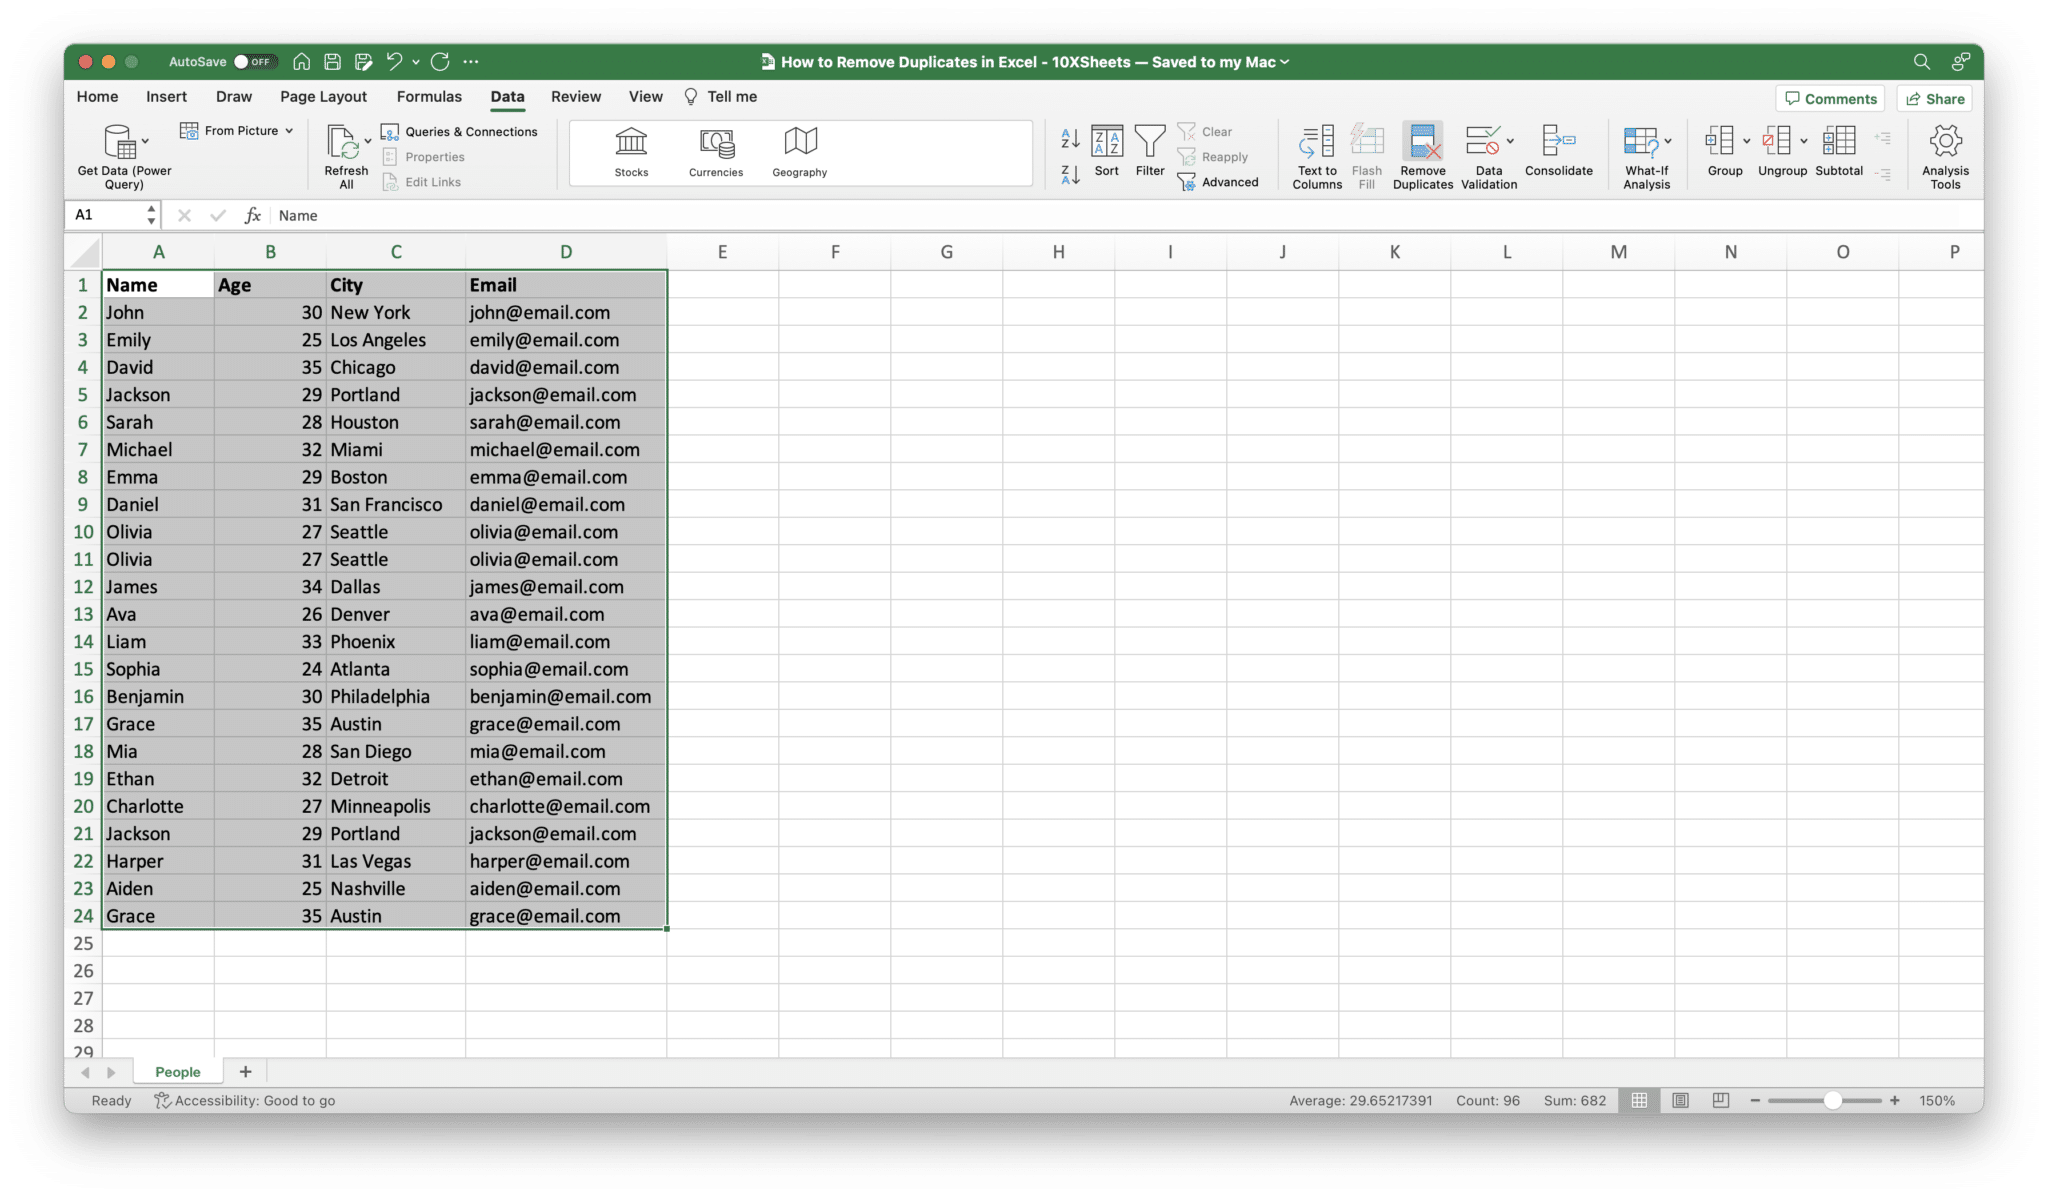
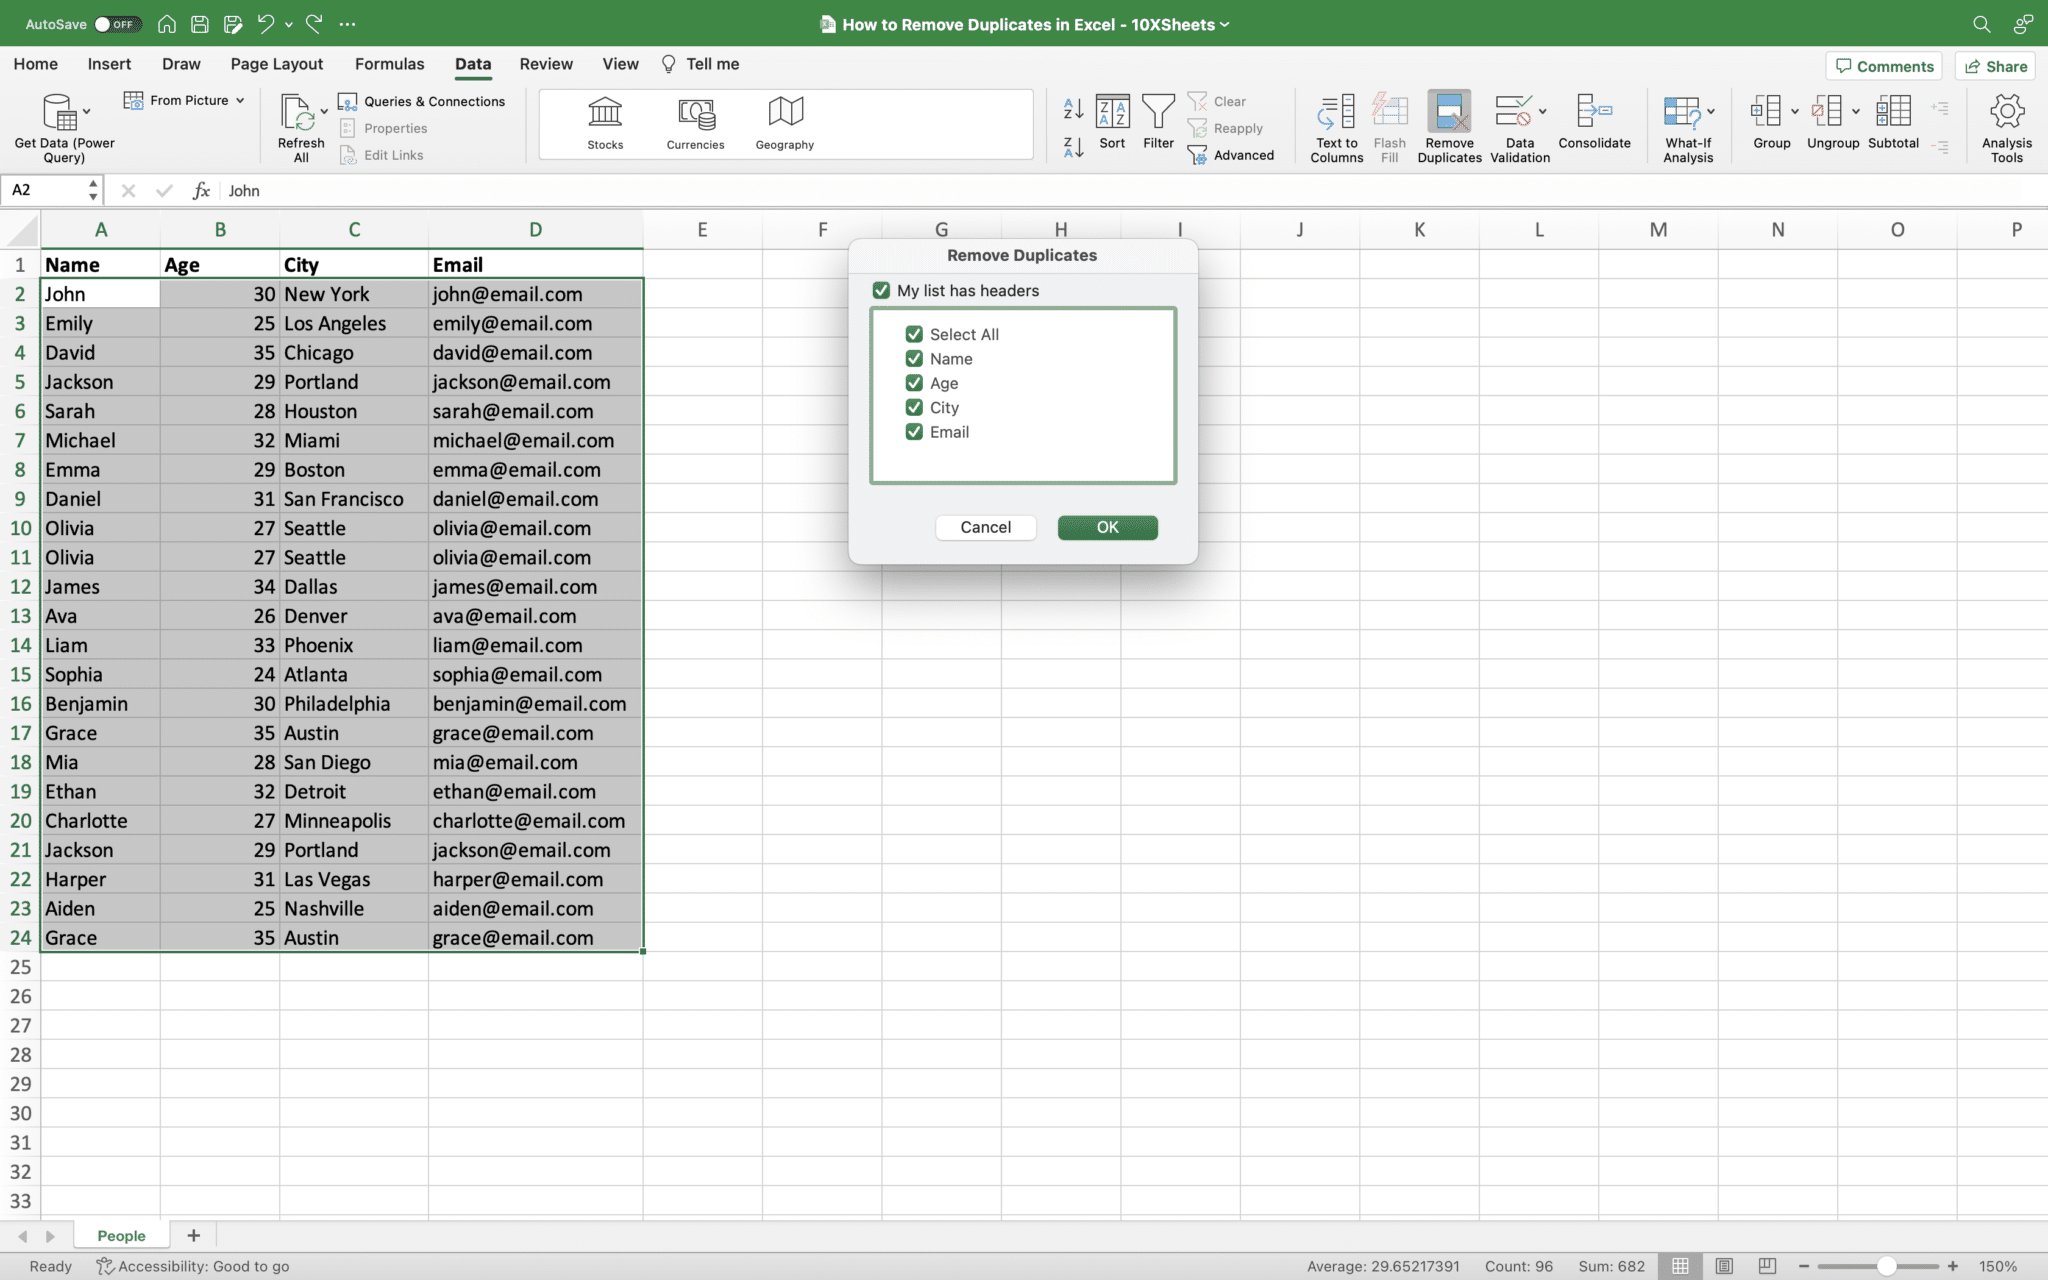
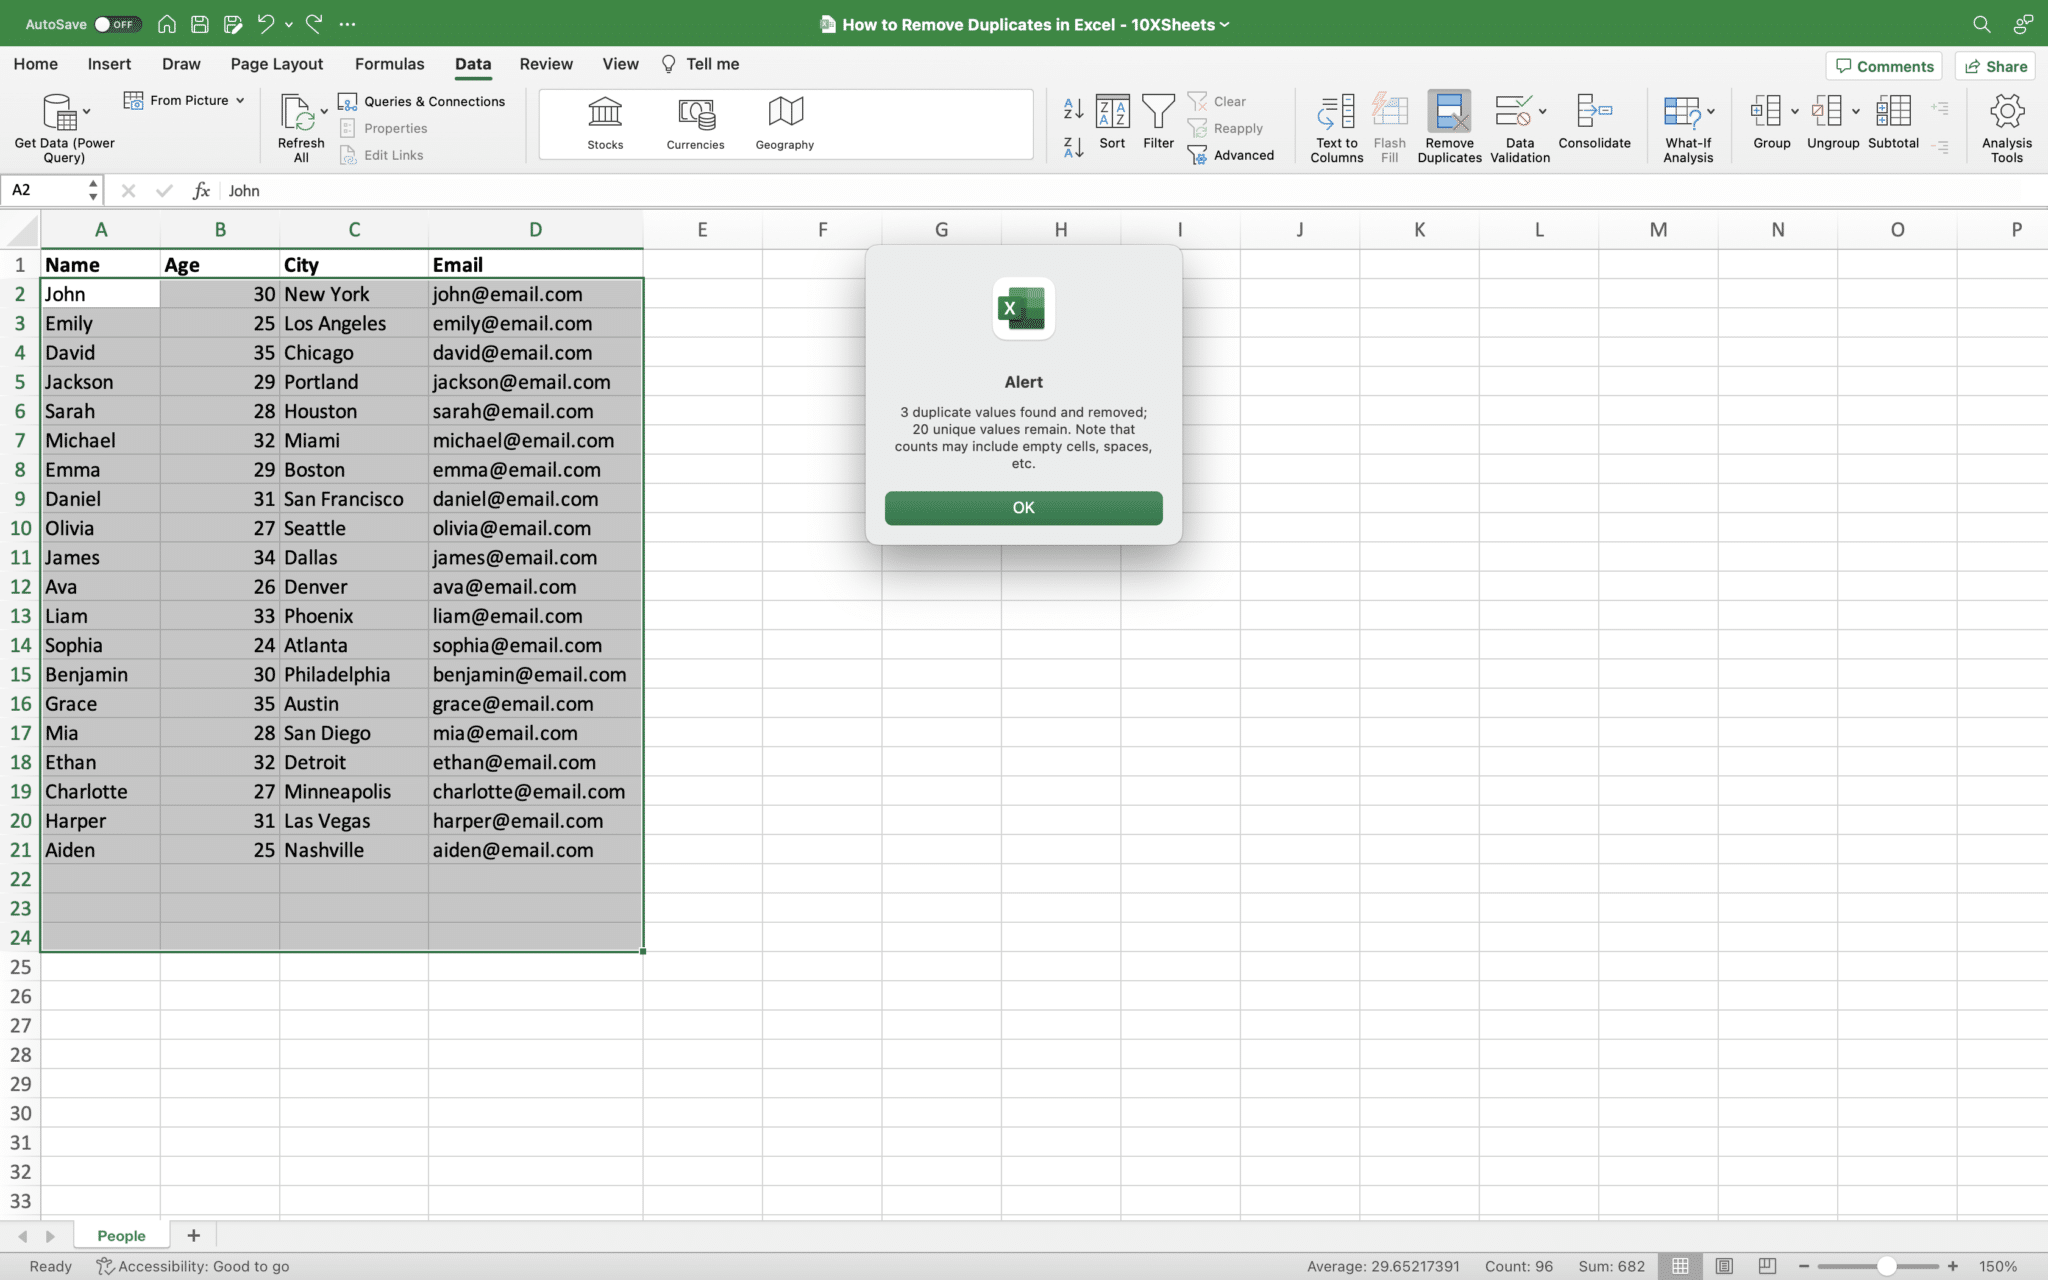
- Accessing the Remove Duplicates feature: Select the range of data you want to process. Go to the “Data” tab in the Excel ribbon, locate the “Data Tools” group, and click on the “Remove Duplicates” button.

- Selecting the data range: Ensure that the correct range is selected. Excel automatically detects the data range based on your initial selection.
- Choosing key columns: In the “Remove Duplicates” dialog box, choose the columns that contain the key values for duplicate identification. You can select one or multiple columns.

- Removing duplicates and preserving unique values: Click the “OK” button to remove duplicates. Excel will retain only the unique values, and the duplicate entries will be deleted.
Understanding the limitations of the Remove Duplicates feature
While Excel’s Remove Duplicates feature is convenient, it does have some limitations to be aware of:
- Case sensitivity and whitespace considerations: The Remove Duplicates feature treats uppercase and lowercase characters as different, which may lead to the retention of case-sensitive duplicates. Additionally, extra spaces within entries can cause them to be recognized as unique.
- Handling data with multiple columns: When using the Remove Duplicates feature, all selected columns must match for an entry to be considered a duplicate. This can be problematic when dealing with data that has multiple columns and slight variations.
Advanced Techniques for Removing Duplicates
In addition to Excel’s built-in features, there are advanced techniques that offer more flexibility and control over duplicate removal. Explore these methods for efficient duplicate elimination:
Using Excel Formulas
Excel’s formulas provide powerful ways to identify and remove duplicates. Consider the following formulas:
- COUNTIF and COUNTIFS functions: These functions allow you to count the occurrences of specific values or combinations of values within a range. By using them, you can identify duplicates based on certain criteria.
- INDEX, MATCH, and FILTER functions: These functions enable you to extract unique values from a dataset by searching for specific conditions. You can combine them to create custom formulas that remove duplicates.
Applying Conditional Formatting to Highlight Duplicates
Conditional formatting is a visual aid that can help you identify duplicate entries. Follow these steps to apply conditional formatting:
- Setting up conditional formatting rules: Select the data range you want to work with. From the Excel ribbon, go to the “Home” tab, locate the “Styles” group, and click on the “Conditional Formatting” button. Choose “Highlight Cells Rules” and then select “Duplicate Values.”
- Customizing formatting options: In the conditional formatting dialog box, choose the formatting style you prefer for highlighting duplicates. This can include font color, background color, or other visual cues.
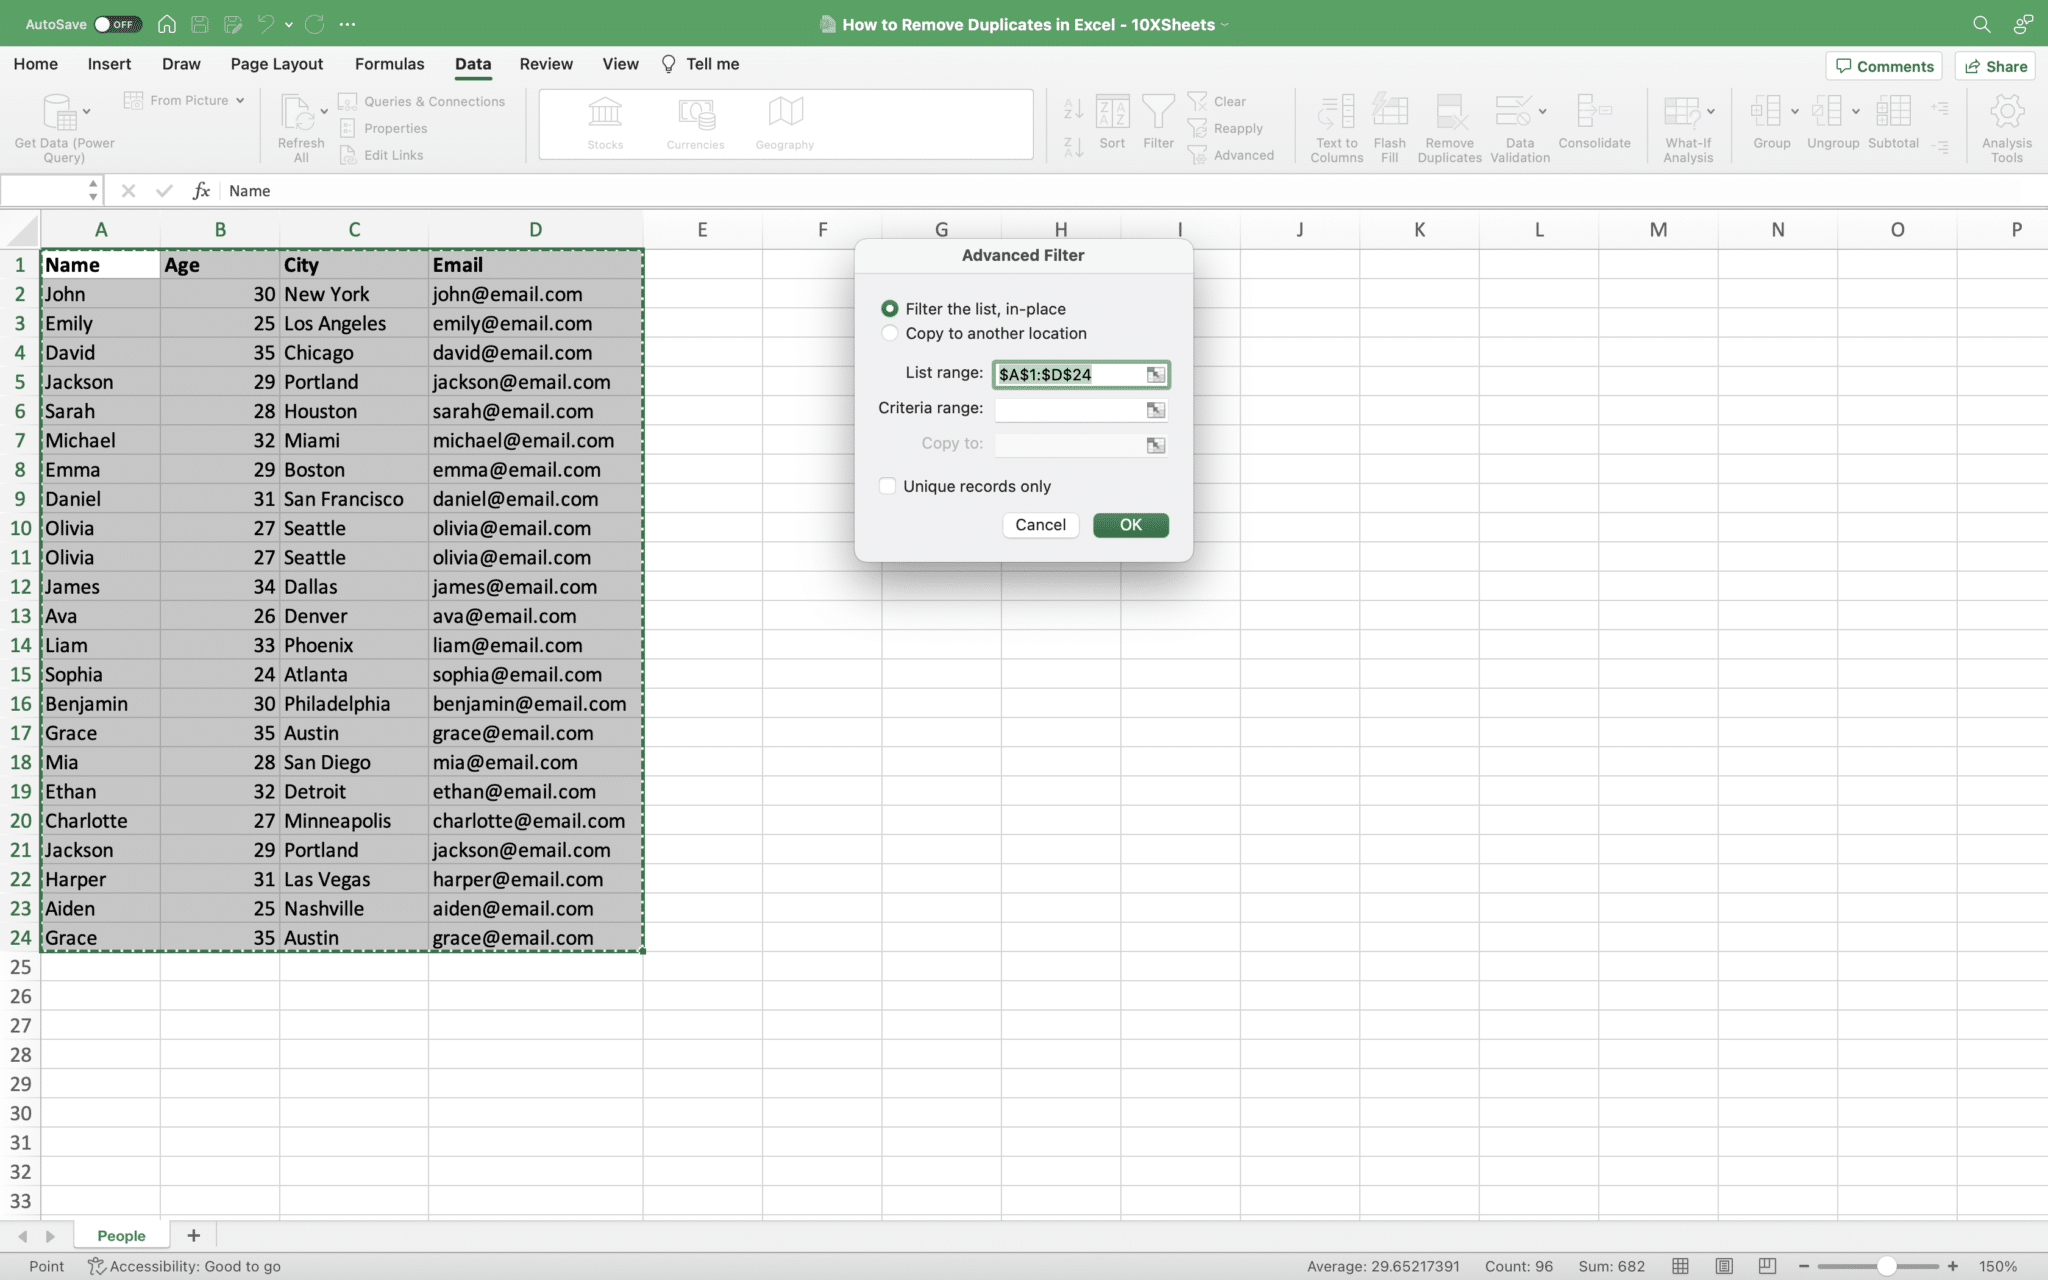
Utilizing Advanced Filter and Unique Functions
Excel’s Advanced Filter and UNIQUE function offer alternative approaches to remove duplicates. Here’s how you can use them:
- Filtering unique values with Advanced Filter: The Advanced Filter feature allows you to extract unique values from a dataset and copy them to a different location. Specify the criteria to filter out duplicates and select the destination for the unique values.
- Extracting unique values with UNIQUE function: The UNIQUE function, available in newer versions of Excel, returns a list of unique values from a range. By referencing the dataset, you can retrieve only the unique values and disregard duplicates.
Removing duplicates with VBA (Visual Basic for Applications)
If you’re comfortable with programming, you can use VBA to create a customized duplicate removal macro. With VBA, you have greater control over the duplicate removal process. Here’s a general outline of the steps involved:
- Understanding the basics of VBA for duplicate removal: Familiarize yourself with VBA syntax and concepts, such as loops and conditional statements.
- Creating and executing a VBA macro for duplicate elimination: Write a VBA macro that iterates through your data, identifies duplicates based on your criteria, and removes them programmatically.
Handling Special Cases
Removing duplicates may present unique challenges depending on the complexity of your data. Consider these special cases and approaches:
Removing duplicates from multiple worksheets or workbooks
When dealing with data spread across multiple worksheets or workbooks, you can employ the following methods:
- Copy and consolidate the data from different sources into a single worksheet or workbook before applying duplicate removal techniques.
- Utilize Excel’s Power Query feature to combine and cleanse data from multiple sources while removing duplicates.
Dealing with large datasets efficiently
For large datasets, efficient duplicate removal is crucial. Optimize the process with these strategies:
- Use Excel’s built-in features first to eliminate obvious duplicates. Then, apply more advanced techniques to fine-tune the removal process.
- Consider breaking down the data into smaller subsets for easier management and analysis. Remove duplicates from each subset individually before combining them.
Addressing case-sensitive duplicates
To address case-sensitive duplicates, follow these steps:
- Convert all entries to lowercase or uppercase using the LOWER or UPPER function.
- Apply duplicate removal techniques to the modified data.
- If needed, restore the original letter case using formulas or find and replace functionality.
Removing duplicates based on specific criteria
If you need to remove duplicates based on specific conditions, utilize Excel’s filtering capabilities:
- Apply filters to the relevant columns and specify the criteria that determine duplicates.
- Copy the filtered data to a new location or overwrite the existing data with the filtered results.
Best Practices for Duplicate Management
To maintain clean and duplicate-free data, follow these best practices:
- Regularly audit and clean data: Perform periodic data audits to identify and remove duplicates. Establish a schedule that fits your data management needs.
- Implement data validation and input controls: Use data validation techniques to prevent the entry of duplicates at the source. Apply input controls to ensure data integrity.
- Create backups before removing duplicates: Before performing any duplicate removal operation, create a backup of your data to avoid accidental data loss or irreversible changes.
- Document data cleansing processes: Maintain documentation of the duplicate removal techniques and processes used. This helps with future audits and ensures consistency in your data management practices.
Troubleshooting and Common Issues
While removing duplicates in Excel, you may encounter some challenges. Here are common issues and their solutions:
Error messages and their solutions
- “The range does not contain valid data”: Ensure that the selected range contains data and that it does not include blank cells or headers.
- “Cannot remove duplicates”: Verify that the range and key columns are correctly selected. Check for any restrictions or limitations specific to the data range or Excel version you’re using.
Potential data loss risks and prevention
- Accidental deletion of unique values: Always double-check your duplicate removal settings before executing the process. Review the resulting data to confirm that unique values are preserved.
- Irreversible changes: Make sure to create backups before removing duplicates. This ensures you can revert to the original data if needed.
Conclusion
Removing duplicates in Excel is an essential step to maintain accurate and reliable data. By following the techniques outlined in this guide, you now have the knowledge and tools to effectively identify and remove duplicates. Remember to prepare your data, utilize Excel’s built-in features, and explore advanced methods when necessary. By implementing best practices and being mindful of potential issues, you can maintain clean, duplicate-free data and unlock the full potential of your Excel analyses and decision-making processes.
Get Started With a Prebuilt Template!
Looking to streamline your business financial modeling process with a prebuilt customizable template? Say goodbye to the hassle of building a financial model from scratch and get started right away with one of our premium templates.
- Save time with no need to create a financial model from scratch.
- Reduce errors with prebuilt formulas and calculations.
- Customize to your needs by adding/deleting sections and adjusting formulas.
- Automatically calculate key metrics for valuable insights.
- Make informed decisions about your strategy and goals with a clear picture of your business performance and financial health.